A Dakota fire hole is a fireside pit that allows you to cook food or boil water while minimizing the amount of smoke that escapes. This is an important skill for any prepper to know, as it will allow you to keep a low profile in the event of a survival scenario.
What is a Dakota fire hole?
A Dakota fire hole is a type of fireside pit that is used to minimize the amount of smoke that escapes. This is done by digging a small pit in the ground and then a small tunnel is dug connecting the fire pit. The small tunnel helps bring the draft in which automatically brings in more oxygen, making the fire burn hotter.
What are the benefits of a Dakota fire hole?
There are many benefits to using a Dakota fire hole over a traditional fire pit. The main benefit is that it significantly reduces the amount of smoke that escapes, making it ideal for use in a survival scenario when you need to stay unnoticed. Since the fire is underground in the hole, no one can spot you, even at night time if you do it right.
A Dakota fire hole is also more efficient than a simple bonfire. The draft tunnel helps the firewood burn hotter and the hole traps the heat energy concentrating it directly on whatever is placed above the fire.
Additionally, it is very easy to build and does not require any special materials or tools. All you need is a shovel and some time.
How do you make a Dakota fire hole?
Before you start to dig in, first you need to choose the right spot. Unlike a traditional bonfire, the Dakota fire hole requires a bit of planning.
Firstly make sure that the ground is hard enough. Wet ground is not ideal because the tunnel can cave in. Avoid making the pit near rocks and trees because tree roots may get in your way. If the area is grassy, then use a shovel to neatly take out the grassy patch, which can be used to plug in the hole after you are done.
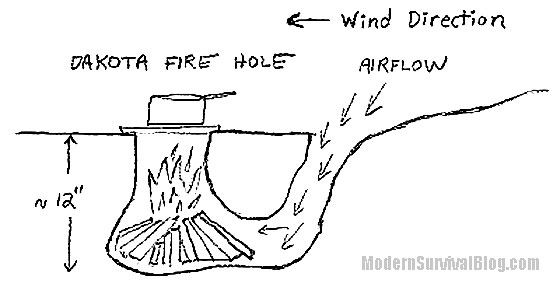
- First, you will need to dig a small pit in the ground. The pit should be large enough to comfortably fit your firewood. 1.5 to 2 feet deep pit should be enough. Usually people prefer to keep it about a foot wide but if you make it wider, you won`t have to waste more time in chopping down your firewood to smaller pieces.
- Once the pit is dug, you will need to figure out the direction of the draft tunnel. Which ever direction the wind is blowing from, that`ll be the direction of your draft tunnel. It is important that the draft tunnel is placed in the right direction so that the fire will get enough oxygen and will burn hotter.
- Now you will need to create a small tunnel connecting the fire pit to the outside air. The tunnel can be 6 inches in diameter. Start digging about 1 foot away from the fire pit and then diagonally dig down till you connect the draft tunnel with the bottom of the fire pit.
- Now you simply need to light your fire. If you want to know how to make a fire, click here.
- When you are finished, make sure to extinguish your fire completely before leaving the area. Cover the fire pit with dirt and rocks that you dug out so that no one will be able to tell it was ever there.
A Dakota fire hole is a great way to cook food or boil water without creating a lot of smoke and drawing attention to yourself. In just a few simple steps, you can build your own Dakota fire hole using materials that you likely already have on hand. So next time you’re planning a camping trip or preparing for a survival scenario, remember this helpful tip!